Step-by-step tutorial to get you started with React.js
React.js is a JavaScript library that helps build user interfaces for websites and web applications. It provides a set of tools and components that make it easier to create interactive and dynamic user interfaces.
Think of a user interface as the visual part of a website or app that you interact with—buttons, forms, menus, and other elements. React.js helps developers create these elements and manage how they change and respond to user interactions.
React.js uses a concept called components, which are like building blocks for a user interface. Developers can create reusable components, such as a button or a navigation bar, and combine them together to create more complex interfaces. Each component can have its own logic and state, allowing it to update and rerender dynamically as needed.
One of the main benefits of React.js is its ability to efficiently update and render only the parts of the user interface that need to change, rather than reloading the entire page. This helps improve performance and provides a smoother user experience.
React.js also encourages a modular and organized approach to building applications. It allows developers to break down the user interface into small, manageable pieces, making it easier to maintain and collaborate on large projects.
Overall, React.js simplifies the process of building interactive web interfaces by providing a structured and efficient way to create, manage, and update the various components of a user interface.
Step by step process
Step 1: Setup and Installation
- Install Node.js: Visit the official Node.js website (https://nodejs.org) and download the latest stable version for your operating system. Follow the installation instructions.
- Create a New React App: Open your terminal or command prompt and navigate to the directory where you want to create your React app. Run the following command:
npx create-react-app my-app
This command will create a new directory called "my-app" and set up a basic React project structure.
Navigate to the App Directory: Change your working directory to the newly created app directory:
cd my-app
Start the Development Server: Start the development server by running the following command:
npm start
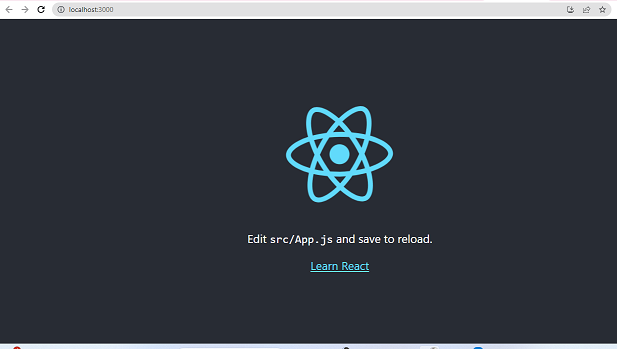
This command will compile your React code and open the app in your default browser on http://localhost:3000/. Any changes you make to your code will automatically refresh the page.
it would be shown like below
Step 2: Understanding the Project Structure
The basic React app structure created by Create React App consists of several files and directories. Here are some important ones:- src: This directory contains your application's source code.
- public: This directory contains static assets such as the HTML file and other media files.
- src/index.js: This is the entry point of your React app.
- src/App.js: This is the main component that represents your application.
Step 3: Writing Your First Component
Open the src/App.js file in your text editor. Remove the existing code and replace it with the following:
import React from 'react';

function App() {
  return (
    <div>
      <h1>Hello, React!</h1>
    </div>
  );
}

export default App;
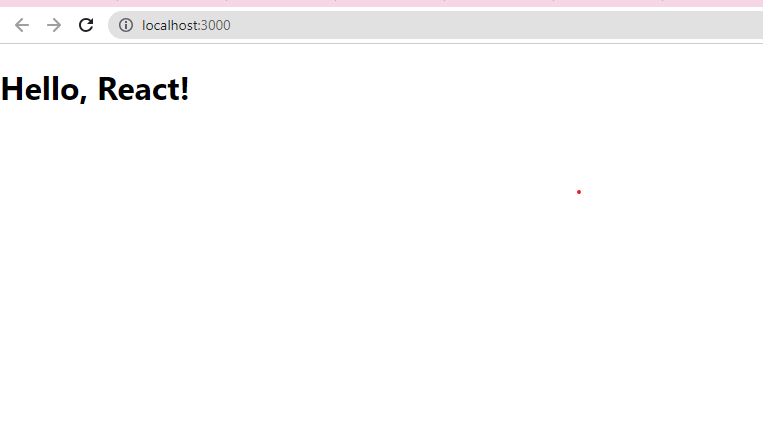
Save the file. Your browser should automatically refresh, and you'll see the "Hello, React!" heading on the page.
it would be shown like this now
Step 4: Creating Additional Components
Create a new file called Header.js in the src directory. Open Header.js and add the following code:
import React from 'react';

function Header() {
  return (
    <header>
      <h2>This is the header component</h2>
    </header>
  );
}

export default Header;
In App.js, import the Header component by adding the following line at the top:
import Header from './Header';
Replace the <h1> element in the App component's return statement with the <Header> component:
function App() {
  return (
    <div>
      <Header />
    </div>
  );
}
Step 5: Styling Components
Create a new file called App.css in the src directory. Open App.css and add the following code:
header {
  background-color: #f2f2f2;
  padding: 20px;
}

h1, h2 {
  color: #333;
}
In App.js, import the CSS file by adding the following line at the top:
import './App.css';
Save the files. The browser should automatically refresh, and you'll see the header component styled with the background color and the text color changed.
Congratulations! You have created a basic React.js app, added components, and styled them. This tutorial should give you a solid foundation to continue exploring React and building more complex applications.
Exploring React and building more complex applications:
Learn React Concepts:
- Understand React Components: Learn about functional components and class components, how to create and use them, and their lifecycle methods.
- State and Props: Understand how to manage state within components and pass data through props.
- JSX: Dive deeper into JSX syntax and understand how to render dynamic content and use expressions.
- React Router: Learn how to implement routing in your React application to enable navigation between different views.
- Hooks: Explore React hooks like useState, useEffect, useContext, and useRef to manage state and side effects in functional components.
- Context API: Learn how to use React's Context API to manage global state and share data across components.
Practice Project-Based Learning:
- Build a Todo List: Create a simple todo list application where users can add, edit, and delete tasks.
- Create a Weather App: Integrate with a weather API and display weather information based on user input.
- Develop a Movie Database: Build a movie database application where users can search for movies, view details, and save favorites.
- Implement a Chat Application: Create a real-time chat application using technologies like React, Firebase, and WebSockets.
- Build an E-commerce Store: Develop an e-commerce application with product listings, shopping cart functionality, and checkout process.
Explore React Libraries and Tools:
- Redux: Learn and implement Redux for managing application state in a predictable manner.
- React Router: Dive deeper into React Router and explore advanced features like nested routes and route guards.
- Material-UI or Bootstrap: Utilize UI component libraries like Material-UI or Bootstrap to enhance the visual appeal of your application.
- Axios or Fetch: Use libraries like Axios or the Fetch API to make HTTP requests and interact with RESTful APIs.
- Testing Frameworks: Explore testing frameworks like Jest and React Testing Library to write unit tests for your components.
Study Advanced Concepts:
- Server-Side Rendering (SSR): Learn about SSR and frameworks like Next.js to render React components on the server for improved performance and SEO.
- Performance Optimization: Study techniques like code splitting, memoization, and lazy loading to optimize the performance of your React application.
- React Native: Expand your skills to mobile app development using React Native, a framework for building cross-platform mobile applications.
- GraphQL: Explore GraphQL as an alternative to RESTful APIs and learn how to integrate it with React.
Join the React Community:
Participate in online forums, such as the React subreddit (https://www.reddit.com/r/reactjs/), to ask questions and learn from others. Join React-focused communities on platforms like Discord, Slack, or GitHub to connect with fellow developers and collaborate on projects. Attend local meetups or conferences related to React to network with professionals and learn from experienced speakers. Remember, building complex applications takes practice and patience. Start with small projects, gradually increase the complexity, and don't hesitate to seek help from the vibrant React community. Happy coding!
The objective of this website is to Train the people in software field, develop them as good human resources and deploy them in meaningful employment. The high level of hands-on-training and case studies ensures that Trainee gain the optimum benefits. Online Tutorial on Technology subjects as below with Interview Questions and Answers.
- .net Interview Questions And Answers
- Accountant Interview Questions And Answers
- Ado.net Interview Questions And Answers
- Adp Interview Questions And Answers
- Agile Methodology Interview Questions And Answers
- Android Interview Questions And Answers
- Apache Interview Questions And Answers
- Application Packaging Interview Questions And Answers
- Asp Interview Questions And Answers
- Backbone.js Interview Questions And Answers
- C Sharp Interview Questions And Answers
- C++ Interview Questions And Answers
- Cake Interview Questions And Answers
- Cakephp Interview Questions And Answers
- Can Protocol Interview Questions And Answers
- Catia V5 Interview Questions And Answers
- Ccna Interview Questions And Answers
- Checkpoint Firewall Interview Questions And Answers
- Control M Interview Questions And Answers
- Cpp Interview Questions And Answers
- Css Interview Questions And Answers
- DATA GRID Interview Questions And Answers
- Data Warehouse Interview Questions And Answers
- Data Structures Interview Questions And Answers
- Database Interview Questions And Answers
- Db2 Interview Questions And Answers
- Desktop Engineer Interview Questions And Answers
- Desktop Support Interview Questions And Answers
- DOJO Interview Questions And Answers
- Electrical Engineering Interview Questions And Answers
- Embedded Systems Interview Questions And Answers
- Hadoop Interview Questions And Answers
- Hibernate Interview Questions And Answers
- J2ee Interview Questions And Answers
- Javascript Interview Questions And Answers
- Joomla Interview Questions And Answers
- Jsp Interview Questions And Answers
- Less Interview Questions And Answers
- Linq Interview Questions And Answers
- Linux Interview Questions And Answers
- Matlab Interview Questions And Answers
- Mcitp Interview Questions And Answers
- Netbackup Interview Questions And Answers
- Node.js Interview Questions And Answers
- Oracle Interview Questions And Answers
- Perl Interview Questions And Answers
- Plsql Interview Questions And Answers
- Postgresql Interview Questions And Answers
- Python Interview Questions And Answers
- Qa Testing Interview Questions And Answers
- Qtp Interview Questions And Answers
- Sap Interview Questions And Answers
- Sass Interview Questions And Answers
- Selenium Interview Questions And Answers
- SEO Interview Questions And Answers
- Sharepoint Interview Questions And Answers
- Silverlight Interview Questions And Answers
- Sql Dba Interview Questions And Answers
- String Interview Questions And Answers
- Struts2 Interview Questions And Answers
- Stware Testing Interview Questions And Answers
- Swing Interview Questions And Answers
- Technical Support Interview Questions And Answers
- Telecom Billing Interview Questions And Answers
- Tomcat Interview Questions And Answers
- Troubleshooting Interview Questions And Answers
- Uml Interview Questions And Answers
- Us Visa Interview Questions And Answers
- Vb Interview Questions And Answers
- Visa Interview Questions And Answers
- Wcf Interview Questions And Answers
- Web Testing Interview Questions And Answers
- Windows Interview Questions And Answers
- Wordpress Interview Questions And Answers
- Wpf Interview Questions And Answers
- XQuery Interview Questions And Answers
- Yii Interview Questions And Answers
- Zend Framework 2 Interview Questions And Answers
- Zend Framework Interview Questions And Answers